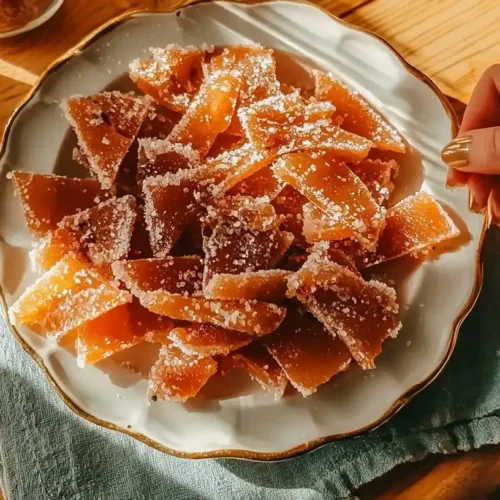
The art of candied grapefruit peel entered my life through my grandmother’s Kentucky kitchen, where nothing edible was ever wasted. I vividly remember watching her hands, veined and skilled, carefully trimming away grapefruit peels that I would have thoughtlessly discarded. “These aren’t garbage,” she’d tell me, her voice carrying the gentle firmness of someone who had lived through lean times. “They’re just waiting to become something beautiful.”
As a child, I marveled at the alchemy – how bitter peels transformed through simple sugar and time into jewel-like confections that she would serve alongside afternoon tea or pack into small tins as holiday gifts. The process seemed magical, turning kitchen scraps into treats that looked store-bought but carried the unmistakable touch of handmade care.
Now in my own home, with my three children gathered around the kitchen island, I continue this tradition. My youngest daughter calls it “candy recycling,” while my teenage son, initially skeptical, became a convert after his first taste of the sweet-tart crystalized strips. These candied grapefruit peels have become not just a treat but a tangible lesson in resourcefulness – one my grandmother would have been proud to see carried forward.
Table of Contents
Table of Contents
Why You’ll Love This Candied Grapefruit Peel
This elegant citrus confection has become a tradition in our home for good reason. Here’s why it deserves a place in your kitchen too:
- Sustainable satisfaction: Transforms kitchen waste into a gourmet treat
- Impressive presentation: Creates candy that looks professionally made
- Versatile uses: Perfect for snacking, gifting, or garnishing other desserts
- Unique flavor profile: Offers a sophisticated sweet-tart balance unlike commercial candy
- Long shelf life: Keeps beautifully for weeks when properly stored
- Conversation starter: Provides a meaningful story about traditional food preservation
For more sustainable, waste-reducing recipes, visit our No-Bake & Quick Treats: Effortless Sweet Indulgences collection, which includes other creative ways to make the most of ingredients.
If you enjoy making homemade versions of store-bought treats, you might also love our Homemade Chocolate Truffles Recipe or our Homemade Kool-Aid Licorice Ropes for more handcrafted confections.candied grapefruit peel.
Simple Ingredients for Candied Grapefruit Peel

Candied Grapefruit Peel
Ingredients
- Peels from 2-3 large grapefruits (preferably pink or ruby red)
- 4 cups water, plus more for blanching
- 2 cups granulated sugar
- 1 tablespoon light corn syrup
- 1/2 teaspoon vanilla extract (optional)
- Additional granulated sugar or superfine sugar for coating
Instructions
- Thoroughly wash the grapefruit under warm water to remove any wax or residue.
- Cut the grapefruits in half and juice them, reserving the juice for other uses.
- Using a spoon, gently scrape away most of the white pith from the inside of the peels, leaving about 1/4 inch for structure.
- Cut the peels into strips about 1/4 inch wide.
- Place the peel strips in a large saucepan and cover with cold water. Bring to a boil, then drain immediately.
- Repeat this blanching process two more times with fresh cold water each time.
- In the same saucepan, combine 4 cups water and 2 cups sugar. Bring to a simmer, stirring until the sugar is completely dissolved. Add the corn syrup and stir to incorporate.
- Add the blanched peel strips to the sugar syrup and simmer gently for 45-60 minutes, until the peels become translucent and the syrup thickens.
- Remove from heat and stir in vanilla extract if using. Allow the peels to cool in the syrup for about 15 minutes.
- Using a slotted spoon, carefully transfer the peels to a wire rack positioned over parchment paper. Separate them to ensure they don't stick together.
- Allow the peels to dry for 2-3 hours until they're still slightly tacky but not wet.
- Roll the slightly tacky peels in granulated or superfine sugar until completely coated.
- Return the sugar-coated peels to the wire rack and allow them to dry completely for at least 24 hours.
- Store in an airtight container with parchment paper between layers to prevent sticking.
Notes
Show Image Simple ingredients transform discarded grapefruit peels into elegant candied treats – a delicious example of waste-not, want-not kitchen wisdom!

For these beautiful candied grapefruit peels, you’ll need:
- Peels from 2-3 large grapefruits (preferably pink or ruby red)
- 4 cups water, plus more for blanching
- 2 cups granulated sugar
- 1 tablespoon light corn syrup (helps prevent crystallization)
- 1/2 teaspoon vanilla extract (optional)
- Additional granulated sugar or superfine sugar for coating
My grandmother would be amused by how something once considered kitchen scraps has become trendy in our waste-conscious era. “We didn’t call it ‘zero-waste cooking,'” she would say with a wry smile, “we just called it common sense.” This recipe honors that practical wisdom while creating something truly special from the humblest beginnings.
For more creative ways to use citrus, explore our comprehensive Homemade Dessert Recipes: Sweet Treats for Everyday Joy guide or try our Lemon Cream Cheese Bread for another bright, citrusy creation.
Easy Step-by-Step Preparation
- Begin by thoroughly washing the grapefruit under warm water to remove any wax or residue. While not every grapefruit is waxed, this precautionary step ensures you’re starting with perfectly clean peels.
- Cut the grapefruits in half and juice them, reserving the juice for drinking or other recipes. My children always volunteer for this step, hoping for the privilege of sampling the fresh juice.
- Using a spoon, gently scrape away most of the white pith from the inside of the peels. Some pith should remain – about 1/4 inch – as it provides structure. My daughter calls this “grapefruit archaeology,” carefully excavating without damaging the colorful outer peel.
- Cut the peels into strips about 1/4 inch wide. Uniform size ensures even cooking, though as my grandmother would say, “A little variation just proves they’re homemade.”
- Place the peel strips in a large saucepan and cover with cold water. Bring to a boil, then drain immediately. This first blanching begins to remove the bitterness.
- Repeat this blanching process two more times with fresh cold water each time. My son keeps careful count, understanding that this triple-blanching is crucial to taming the natural bitterness of the peel.
- In the same saucepan, combine 4 cups water and 2 cups sugar. Bring to a simmer, stirring until the sugar is completely dissolved. Add the corn syrup and stir to incorporate.
- Add the blanched peel strips to the sugar syrup and simmer gently for 45-60 minutes, until the peels become translucent and the syrup thickens. My kitchen timer is essential here, as the transformation happens gradually.
- Remove from heat and stir in vanilla extract if using. Allow the peels to cool in the syrup for about 15 minutes, infusing them with additional sweetness and flavor.
- Using a slotted spoon, carefully transfer the peels to a wire rack positioned over parchment paper. Separate them to ensure they don’t stick together. This precise arrangement, which my youngest approaches like an art project, ensures even drying.
- Allow the peels to dry for 2-3 hours until they’re still slightly tacky but not wet. This patience-testing wait creates the perfect texture for the final sugar coating.
- Roll the slightly tacky peels in granulated or superfine sugar until completely coated. My children take turns with this step, creating what they call “sugar worms” that glisten with crystalline sweetness.
- Return the sugar-coated peels to the wire rack and allow them to dry completely for at least 24 hours. My daughter checks them periodically, her excitement growing as they transform into finished candy.
- Store in an airtight container with parchment paper between layers to prevent sticking. They will keep for several weeks at room temperature, though they rarely last that long in our house.
The entire process spans about two days, but the actual hands-on time is less than an hour, making these candied grapefruit peels a perfect weekend project that yields treats for weeks to come.
My Best Tips for Perfect Candied Grapefruit Peel
Through years of perfecting this recipe (with my grandmother’s guidance in my early attempts), I’ve gathered several tips that ensure consistent success:
For the most beautiful color: Choose pink or ruby red grapefruits rather than white varieties. Their natural blush creates that lovely coral hue in the finished candy that makes them look particularly special. My grandmother insisted that “people eat with their eyes first,” and these colorful treats prove her point.
For the perfect texture: Don’t rush the simmering process. The slow transformation of the peels from opaque to translucent is essential for the right mouthfeel – not too tough, not too soft. My first impatient attempt resulted in leathery strips that taught me the value of my grandmother’s unhurried approach.
For more homemade gift ideas, check our Special Occasion Desserts: Celebration Sweets collection or try our Chocolate Covered Cherry Rice Krispies Treat for another giftable treat.
Answers to Your Candied Grapefruit Peel Questions
Q: Can I use other citrus peels with this method? Absolutely! Orange, lemon, and lime peels all work beautifully with this same technique. My children enjoy creating “citrus assortments” with different colors and flavors. Just note that smaller fruits like limes will yield thinner, more delicate strips that may require slightly less cooking time.
Q: Why are my candied peels still bitter? The most common reason is insufficient blanching. Make sure you boil and drain the peels three separate times with fresh water each time. My grandmother would occasionally add a fourth blanching for particularly bitter grapefruits – her sensitive taste buds could detect what needed to be done.
For more sustainable kitchen ideas, try our Raspberry Coconut Magic Bars or explore our Cake & Sweet Bread Delights: Simple Baking Projects for more sweet inspiration.
Candied Grapefruit Peel: Sweetness Born of Patience
There’s something profoundly satisfying about transforming what would have been thrown away into something precious. These glistening strips of candied peel remind me of my grandmother’s generation – people who understood the value of patience, resourcefulness, and finding beauty in unexpected places.
Last Christmas, my teenage son (who once questioned why anyone would eat candied peels) proudly presented hand-dipped chocolate versions to his friends, explaining the process and the story behind them. Watching him share not just candy but heritage filled me with the particular joy that comes from seeing traditions travel forward through young hands.
My grandmother passed away several years ago, but in my kitchen, with grapefruit peels simmering on the stove, I feel her wisdom living on. “Good things can’t be rushed,” she would say, whether referring to candy-making or life’s bigger transformations. These sweet-tart confections, born of patience and care, are more than treats – they’re tangible reminders that often the most beautiful things require time and transformation.
I hope these candied grapefruit peels bring as much joy to your kitchen as they have to mine. May they remind you, with each crystalline bite, that sometimes what appears to be waste is simply waiting to become something wonderful.
With warmth, Sophia


